Showing posts with label Photoshop. Show all posts

Saturday, March 24, 2012

Brilliant Shine Background in Photoshop Tutorial

et’s create a new file (File>New) that would have 1024×768 px and 72 dpi. Next select the Paint Bucket Tool (G) and give the new file black color.

Create Brilliant Shine Background in Photoshop CS3

Apply on the made layer the next parameters: Filter>Noise>Add Noise

Create Brilliant Shine Background in Photoshop CS3

Create Brilliant Shine Background in Photoshop CS3

Make a copy of the last made layer, using for it these shown parameters: Blending mode-Color Dodge

Create Brilliant Shine Background in Photoshop CS3

Merge Down layers by pressing the Ctrl button for marking the appropriate layers and press then CTRL+E. Make a click on the same layer on Add a Mask option that may be found on the lowest part of the layers’ panel. After that we should use the Brush Tool (B) with Opacity of 30% and black color to clean out the below demonstrated zones on the picture.

Create Brilliant Shine Background in Photoshop CS3

Create Brilliant Shine Background in Photoshop CS3

Take the Rectangle Tool (U) to give our picture a kind of surface

Create Brilliant Shine Background in Photoshop CS3

Use the next parameters on this layer by making a mouse click on the processed layer on the layers’ panel: Fill 0%
Blending Options>Gradient Overlay

Create Brilliant Shine Background in Photoshop CS3

Gradient’s parameters:

Create Brilliant Shine Background in Photoshop CS3

Create Brilliant Shine Background in Photoshop CS3

Simple Abstract Text Effect in Photoshop

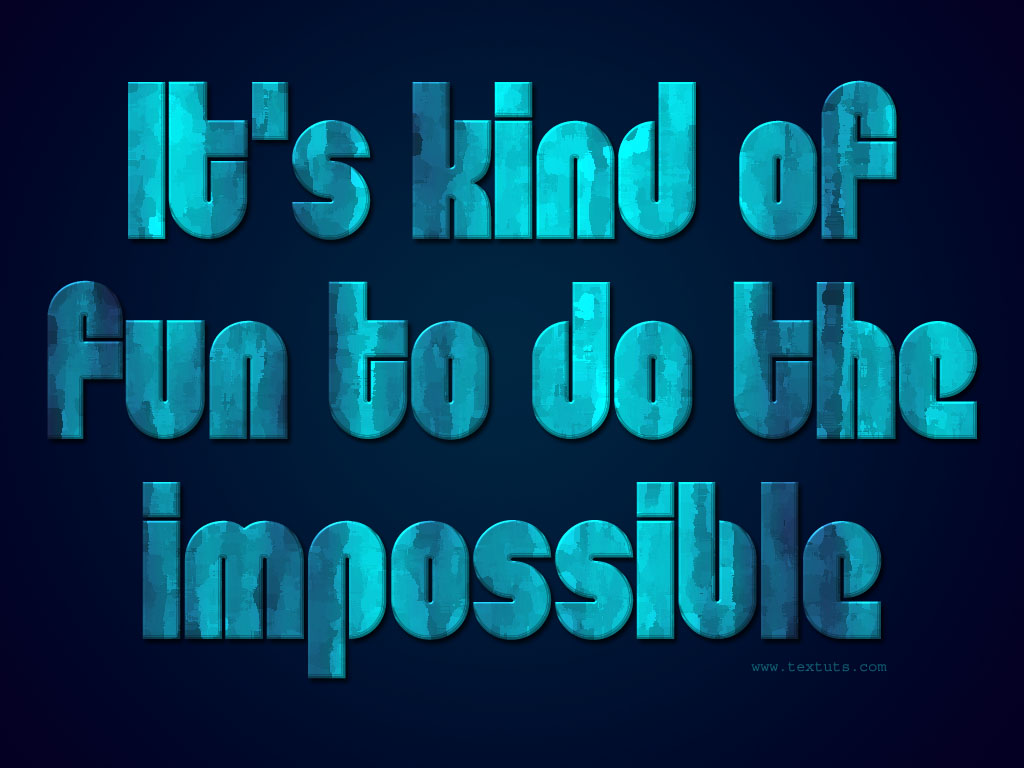
This is a very simple 3-step way to create a really nice abstract text effect, using a couple of Filters and Layer Styles.

The Final Result:
Notes:
* the software used in this tutorial is Adobe Photoshop CS5 Extended
* the size of the final result image is 1024 * 768
* you might want to check the Basix Page to see some useful topics on dealing with Photoshop basics, such as loading palettes and some shortcuts.
Resources:
* You might need to load the Contours used in the tutorial, so check this image to see how to do so.
Step 1:
- Set the Foreground color to #002741 and the Background color to #040022. Pick the Gradient Tool, choose the Foreground to Background gradient, and click the Radial Gradient icon in the Options Bar. Then create a radial gradient from the center of the document to one of the corners.
Simple Abstract Text Effect step 1
- Create the text using the color #ffffff (White). The font used is Dan, and the Size is 220 pt. If your text is long, you might need to adjust the Leading value to decrease the spaces between the lines.
Simple Abstract Text Effect step 1
- Press the Ctrl key and click the text layer’s thumbnail (icon) to create a selection.
Simple Abstract Text Effect step 1
- Set the Foreground color to #00f6ff and the Background color to #201948. Create a new layer on top of the text layer and call it “Texture”, then make the text layer invisible by clicking the eye icon next to it.
Simple Abstract Text Effect step 1
Step 2:
In this step, we will apply a couple of Filters to create the abstract texture.
- First, go to Filter -> Render -> Clouds. Then go to Select -> Deselect, or press Ctrl + D to get rid of the selection.
Simple Abstract Text Effect step 2
- Next, go to Filter -> Render -> Fibers. Set the Variance to 10 and the Strength to 2.
Simple Abstract Text Effect step 2
- You can change the Zoom value (from the drop down menu or using the – icon) to make sure that you like the color distribution, if not, you can click the Randomize button until you like the result. Then click OK.
Simple Abstract Text Effect step 2
- You should get something like this.
Simple Abstract Text Effect step 2
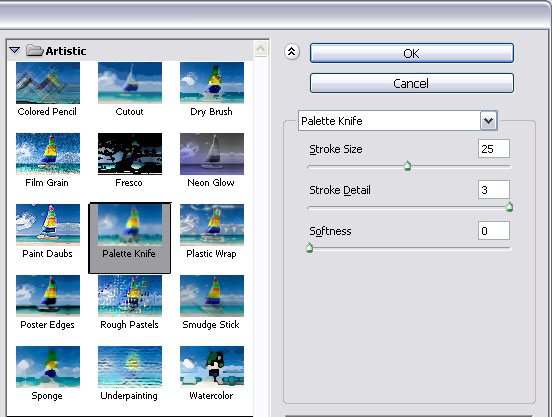
- Finally, go to Filter -> Artistic -> Palette Knife. Change the Stroke Size to 25, the Stroke Detail to 3, and the Softness to 0.
Simple Abstract Text Effect step 2
- And we’re done with the texture.
Simple Abstract Text Effect step 2
Step 3:
In this step, we will apply some Layer Styles to add a bit of depth to the text, so that it doesn’t look flat. So double click the “Texture” layer to apply the following effects:
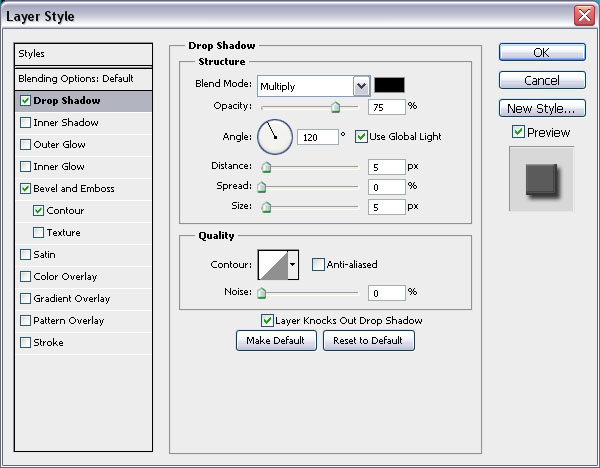
- Drop Shadow: Just use the default values.
Simple Abstract Text Effect step 3
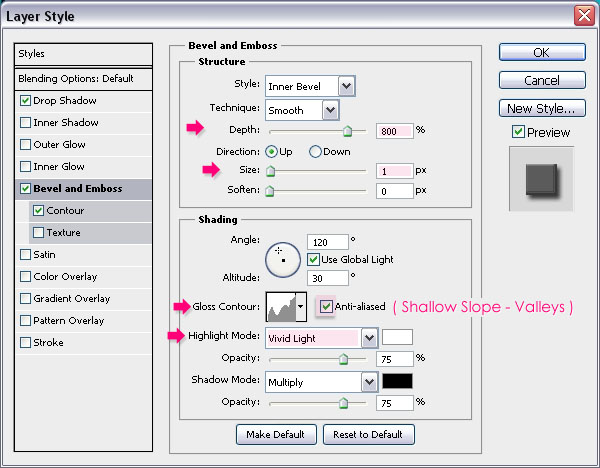
- Bevel and Emboss: Change the Depth to 800, the Size to 1, the Gloss Contour to Shallow Slope – Valleys and check the Anti-aliased box, and change the Highlight Mode to Vivid Light.
Simple Abstract Text Effect step 3
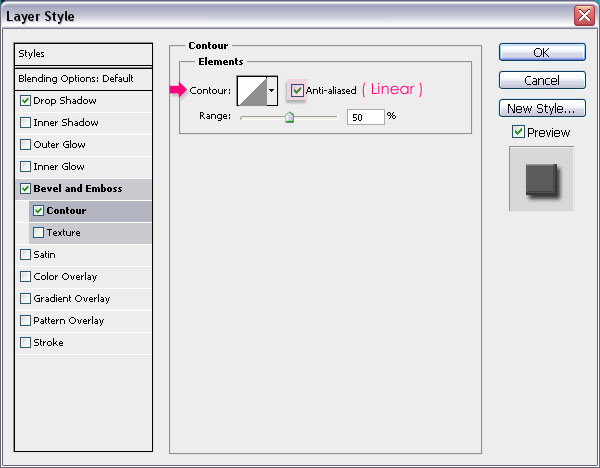
- Contour: Just check the Anti-aliased box.
Simple Abstract Text Effect step 3
- That’s it! You can use different shades of colors if you like as well.
Simple Abstract Text Effect step 3
Hope you enjoyed this super easy tutorial.

Photoshop Yourself With a Celebrity

Photoshop Yourself With A Celebrity Tutorial


This tutorial will show you how to Adobe Photoshop yourself to be with a Celebrity alive or dead. This is one of my most requested tutorials , so here goes …….
We start with a photo of your face…
Your Face

And a photo you want to add yourself into ..
Original Photo - Nixon & Elvis
Choose Quick Select Tool
Quick Select  Tool
And select the face, not including the hair, you may not need the eats either.
Select Face
Goto Edit -> Copy
Copy
Then goto the photo you are going to photoshop yourself into and then
Edit -> Paste
Paste
Now you need to re-size ”your” face to the same size as the original face.
Resize Face
See Below for re-sized face.
Resize Face-2
Move your face on top of the original face and change the Opacity so you can see through it.
Layer Opacity
Now you need to align your face with the original face, I tend to try and align the eyes and mouth.
Align Your Face
Choose the eraser tool

Now change the Opacity of the Eraser to a low amount between 10-30% and start rubbing out/erasing some of your face as below, in this case I removed my ears and the outside of my face, as you can see below!
Eraser-2
Once you are happy, change your top Layer Opacity to 100%.
Layer Opacity 100%
Now in this photo I want to Desaturate my image.
Desaturate

Now the image is desaturated, we still need to do some work to make it blend as it doesn’t look right just yet.

Desaturated

Now we need to change the Levels to make the image blend a bit more, but its still not done yet, needs more work.

Levels

Now we need to change the Brightness & contrast, see below for this example.

Brightness & Contrast

Final Image

Final Image of Me and Elvis

I hope this has helped you out, it takes time for me to write these for free, so please consider supporting me and my family who put up with me :)